Body of Project Process page
The Project Process
How I Design & Build Effective Websites
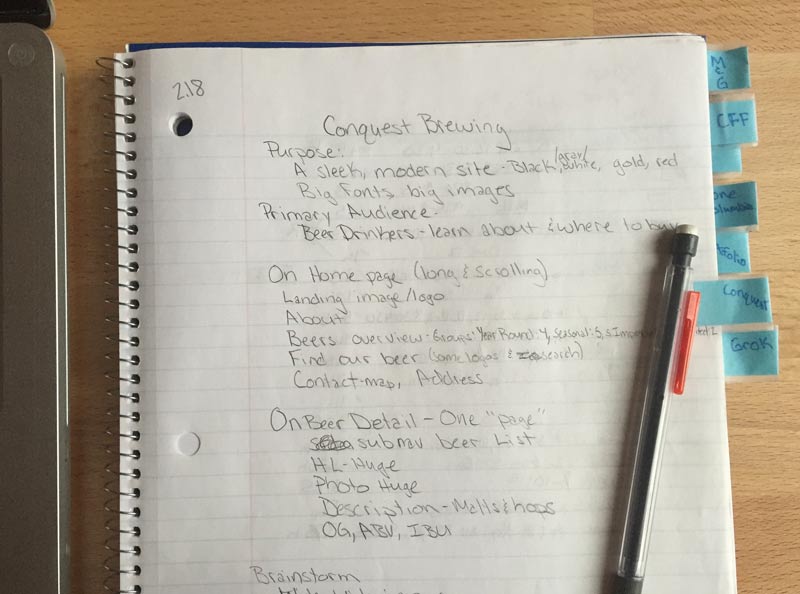
Every project begins with research. I start by developing answers to standard project brief questions which determine the goals and direction of the project. This helps me form a framework for the project that I record in a project notebook. From there I research cutting edge websites of the same category as the project, looking at hundreds of them to determine what works well and what doesn’t. I curate a list of the components needed on this project’s pages and collect a large body of inspiration for the project. Armed with both of these, I get to sketching.
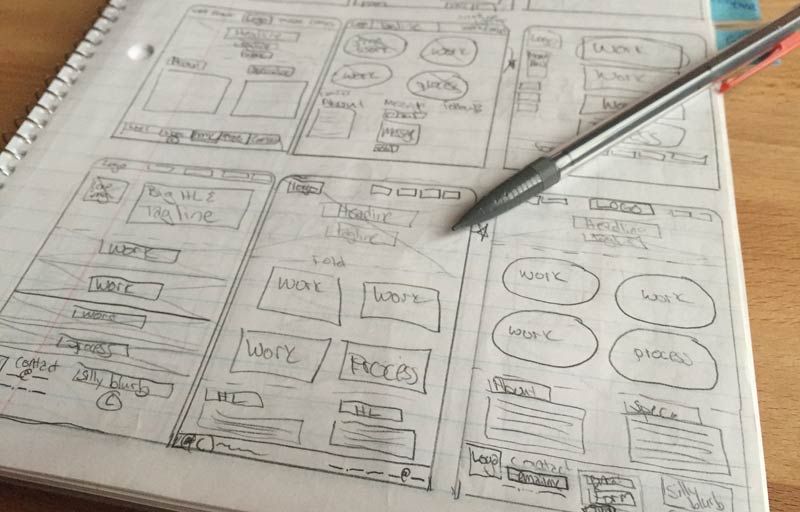
Sketching is an invaluable part of planning.The purpose of sketching is to get a feel for the size, shape, and arrangement of a site’s components. I’ll try out many different layouts, and for any tricky sections, I’ll take a few sketches to work out just that area. By starring the pieces that work best, I’m able to pull together a final sketch for each type of page. All of my projects are designed responsively, so I take this a step further. Most of my sketches are of the desktop layout, since it’s the most complicated, but when it's done I sketch out how the site will flow in small and medium sized displays as well. The next step I take is to create wireframes.
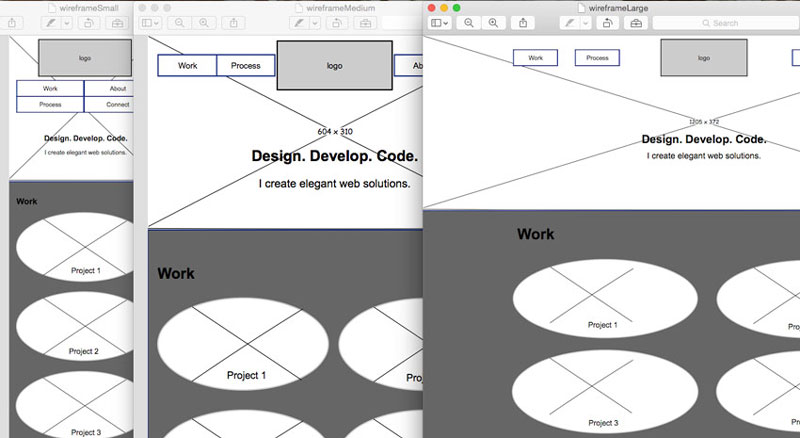
Wireframes focus on content, functionality, and user behavior.In these black and white layouts, I use real content if it is available. If it has yet to be written or edited, I use placeholder text with real words and sentences in the lengths of the eventual content. Starting with the smallest sized wireframe ensures that I’m prioritizing the content. I create wireframes for each screen size the layout requires. If any internal pages are complex, I’ll complete wireframes for those as well. Feedback from other designers and UX specialists helps ensure the layouts make sense and meet the project goals. After wireframes are client approved, I move on to mock-ups.
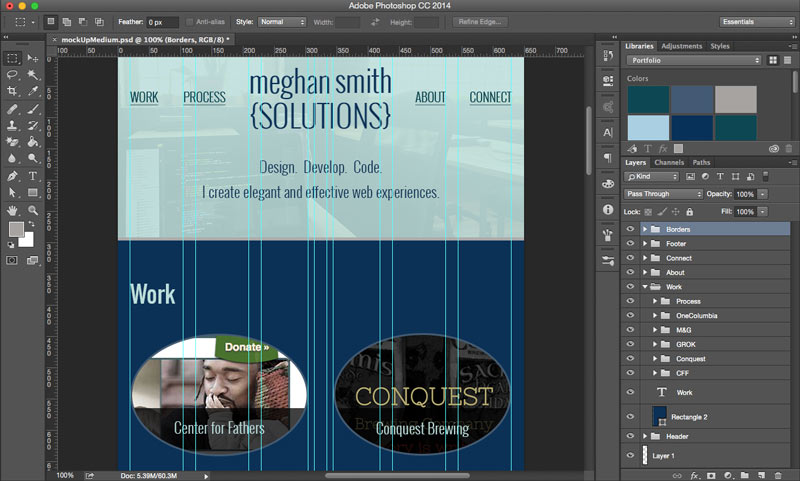
The first step of making mock-ups is more research.Since the content is the most important part of a site, I design it first. I research fonts that have an appropriate feel for the project. I test them and establish a baseline grid for the site. If I’m the one to write or edit the copy, I do it at this stage. I also research color schemes and bring in colors that enhance the feel of the project. Once those decisions have been tentatively made, I begin the mock-up in Photoshop. I get a lot of feedback at this stage as well, and my decisions regarding the layout, colors, fonts, and images get solidified. I design all necessary sizes of the page. The mock-ups that a client signs off on closely resembles the final site in most cases. Once the mock-ups are approved, it's time to start coding.
The coding stage is where I turn pictures into usable websites.To start, I set up a version control system so that I can always go back to an earlier stage if there is an issue. Then I use my designs to map out how the HTML needs to be divided. When the HTML for the first page is complete, I start on the styles. I use SASS to take advantage of programming language features that aren’t native to CSS. I can set variables and create mixins to make the styles more concise and editable. Starting with the mobile size first, I work header-to-footer on the styles and then add the appropriate media queries to make adjustments for each screen width. When the styles are substantially complete, I add the JavaScript and jQuery. To avoid surprises, I start testing at this point.
Thorough testing is essential to creating a good user experience.I run my HTML through the W3C Validator to ensure that I’m using valid markup. Then I run it through an outliner to make sure I’ve included all the appropriate headlines and I check that my HTML is accessible to screen readers. I make adjustments and test again until everything is solid. Then I write the HTML for the next page. If it’s to be a template, I use classes and elements that will make sense and carry over for many pages. When the HTML is done, I begin again with the smallest size styles. As the website nears completion, I again seek feedback. I also run through a UX checklist to ensure the site exceeds standards.
Many of my sites are built in Wordpress. Originally a blogging platform, Wordpress is one of the most customizable and powerful content management systems available. When I turn my sites over, I include an hour or two of training, which is more than enough to make an average computer user comfortable updating their own site - the photos, headlines, articles, and events. I leave detailed how-tos and customize the back end so that people only see the options they need to update the things they care about.
I’ve laid the stages out in order but in reality, there’s a lot of circling around.It isn't just linear: Research, Sketch, Wireframe, Mock-up, Code, Test, Refine. If something isn’t working in the mock-up, I may research further and rework the wireframe. If something is giving a bad user experience after it’s coded, I may research and rework the design. While my final websites resemble my sketches, they get refined along the way. There are many checkpointswhere I examine the site to make sure it meets its intended purpose - I think that’s the beauty of this process.
Let's Connect!
Whether you want to work together, find out more, or tell me why your business is great - please reach out to me! You can find me on LinkedIn or send me an email:
Connect@MeghanSmithSolutions.com